.. _dev_guide-label:
Developer Guide
This 6-step guide is intended to give people who want to start contributing their own tools to HyperSpy a foothold to kick-start the process. This is also the way to start if you ultimately hope to become a member of the developer team.
We anticipate that many potential contributors and developers will be scientists who may have a lot to offer in terms of expert knowledge but may have little experience when it comes to working on a reasonably large open-source project like HyperSpy. This guide is aimed at you - helping to reduce the barrier to make a contribution.
Before you start you should decide which platform (i.e. Linux, Windows, or Mac) you are going to work in. All are possible and the advice below is the same it’s only the specifics that change.
1. Start using HyperSpy and understand it
The best way to start understanding how HyperSpy works and to build a broad overview of the code as it stands is to use it – so what are you waiting for? Install HyperSpy.
The user-guide also provides a good overview of all the parts of the code that are currently implemented as well as much information about how everything works – so read it well: HyperSpy User-Guide.
For developing the code the home of HyperSpy is on github and you’ll see that a lot of this guide boils down to using that platform well. so visit the following link and poke around the code, issues, and pull requests: HyperSpy on Github.
It’s probably also worth visiting the Github home page and going through the “boot camp” to get a feel for the terminology.
In brief, to give you a hint on the terminology to search for, the contribution pattern is:
Setup git/github if you don’t have it.
Fork HyperSpy on github.
Checkout your fork on your local machine.
Create a new branch locally where you will make your changes.
Push the local changes to your own github fork.
Create a pull request (PR) to the official HyperSpy repository.
Note: You cannot mess up the main HyperSpy project unless you have been promoted to write access and the dev-team. So when you’re starting out be confident to play, get it wrong, and if it all goes wrong you can always get a fresh install of HyperSpy!!
PS: If you choose to develop in Windows/Mac you may find Github Desktop useful.
2. Got a problem? – ask!
Open source projects are all about community - we put in much effort to make good tools available to all and most people are happy to help others start out. Everyone had to start at some point and the philosophy of these projects centres around the fact that we can do better by working together.
Much of the conversation happens in ‘public’ via online platforms. The main two forums used by HyperSpy developers are:
Gitter – where we host a live chat-room in which people can ask questions and discuss things in a relatively informal way.
Github – the main repository for the source code also enables issues to be raised in a way that means they’re logged until dealt with. This is also a good place to make a proposal for some new feature or tool that you want to work on.
3. Pick your battles
Work out what you want to contribute and break it down in to manageable chunks.
You may have a very clear idea of what you want to contribute but if you’re not sure where to start you can always look through the issues and pull requests on the GitHub Page. You’ll find that there are many known areas for development in the issues and a number of pull-requests are part finished projects just sitting there waiting for a keen new contributor to come and learn by finishing.
When you’ve decided what you’re going to work on - let people know using the online forums!
It may be that someone else is doing something similar and can help, it’s also good to make sure that those working on related projects are pulling in the same direction.
4. Get good habits
There are 3 key points to get right when starting out as a contributor - keep work separated in manageable sections, make sure that your code style is good, and bear in mind that every new function you write will need a test and user documentation!
Use git and work in manageable branches
By now you’ll have had a look around GitHub - but why’s it so important?
Well GitHub is the public forum in which we manage and discuss development of the code. More importantly, it enables every developer to utilise Git which is an open source “version control” system that you can use on your laptop or desktop. By version control we mean that you can separate out your contribution to the code into many versions (called branches) and switch between them easily. Later you can choose which version you want to have integrated into HyperSpy.
You can learn all about Git here!
The most important thing for you to do is to separate your contributions so that each branch is small advancement on the “master” code or on another branch. In the end each branch will have to be checked and reviewed by someone else before it can be included - so if it’s too big, you will be asked to split it up!
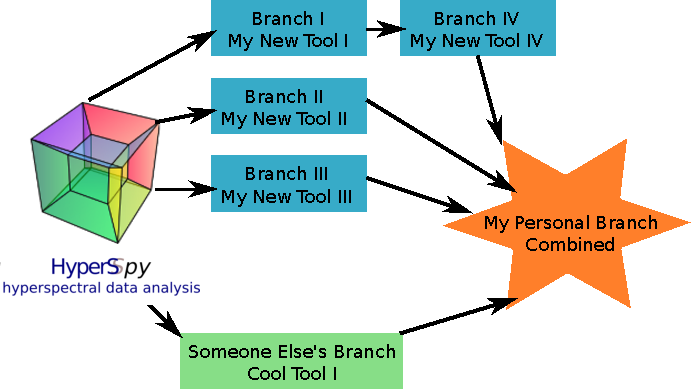
For personal use, before integrating things into the main HyperSpy code, you may want to use a few branches together. You can do that but just make sure each new thing has it’s own branch! You can merge some together for your personal use.
Diagrammatically you should be aiming for something like this:
Get the style right
HyperSpy follows the Style Guide for Python Code - these are just some rules for consistency that you can read all about in the Python Style Guide.
You can check your code with the pep8 Code Checker.
Write tests
Every new function that is written in to HyperSpy needs to be tested and documented.
Tests are short functions found in hyperspy/tests that call your functions under some known conditions and check the outputs against known values. They should depend on as few other features as possible so that when they break we know exactly what caused it. Ideally, the tests should be written at the same time than the code itself, as they are very convenient to run to check outputs when coding. Writing tests can seem laborious but you’ll probably soon find that they’re very important as they force you to sanity check all you do.
HyperSpy uses the py.test library for testing. The
tests reside in the hyperspy.tests module. To run them:
py.test --pyargs hyperspy
Or, from HyperSpy’s project folder simply:
py.test
Useful hints on testing:
When comparing integers, it’s fine to use
==. When comparing floats, be sure to usenumpy.testing.assert_almost_equal()ornumpy.testing.assert_allclose().numpy.testing.assert_equal()is convenient to compare numpy arrays.The
hyperspy.misc.test_utils.pycontains a few useful functions for testing.@pytest.mark.parametrize()is a very convenient decorator to test several parameters of the same function without having to write to much repetitive code, which is often error-prone. See pytest documentation for more details.It is good to check that the tests does not use too much of memory after creating new tests. If you need to explicitly delete your objects and free memory, you can do the following to release the memory associated to the
sobject, for example:
del s
gc.collect()
Once, you have pushed your PR to the official HyperSpy repository, it can be useful to check the coverage of your tests using the coveralls.io check of your PR. There should be a link to it at the bottom of your PR on the github PR page. This service can help you to find how well your code is being tested and exactly which part is not currently tested.
pytest-sugar can be installed to have a nicer look and feel of py.test in the console (encoding issue have been reported in the Windows console).
Plot testing
Plotting is tested using the @pytest.mark.mpl_image_compare decorator of
the pytest mpl plugin. This
decorator uses reference images to compare with the generated output during the
tests. The references images are located in the folder defined by the argument
baseline_dir of the @pytest.mark.mpl_image_compare decorator.
To run plotting tests, you simply need to add the option --mpl:
pytest --mpl
If you don’t use the --mpl, the code of the tests will be executed but the
images will not be compared to the references images.
If you need to add or change some plots, follow the workflow below:
Write the tests using appropriate decorator such as
@pytest.mark.mpl_image_compare.If you need to generate new reference image in the folder
plot_test_dir, for example, run:py.test --mpl-generate-path=plot_test_dirRun again the tests and this time they should pass.
Use
git addto put the new file in the git repository.
When the plotting tests are failling, it is possible to download the figure comparison images generated by pytest-mpl in the artifacts tabs of the corresponding build.
- The plotting tests need matplotlib > 3.0.0, since small changes in the way
matplotlib generates the figure can make the tests fail.
In travis and appveyor, the matplotlib backend is set to agg by setting
the MPLBACKEND environment variable to agg. At the first import of
matplotlib.pyplot, matplotlib will look at the MPLBACKEND environment
variable and set accordingly the backend.
See pytest-mpl for more details.
Write documentation
Documentation comes in two parts: docstrings and user-guide documentation.
Docstrings – written at the start of a function and give essential information about how it should be used, such as which arguments can be passed to it and what the syntax should be. The docstrings need to follow the numpy specification, as shown in this example.
User-guide documentation – A description of the functionality of the code and how to use it with examples and links to the relevant code.
When writing both the docstrings and user guide documentation, it is useful to have some kind of data which the users can use themselves. Artificial datasets for this purpose can be found in hyperspy.datasets.artificial_data.
Build the documentation – To check the output of what you wrote, you can build
the documentation by running the make command in the hyperspy/doc
directory. For example make html will build the whole documentation in
html format. See the make command documentation for more details.
To install the documentation dependencies, run either
$ conda install hyperspy-dev
or
$ pip install hyperspy[build-doc]
5. Make your contribution
When you’ve got a branch that’s ready to be incorporated in to the main code of HyperSpy – make a pull request on GitHub and wait for it to be reviewed and discussed.
6. Contributing cython code
Python is not the fastest language, and can be particularly slow in loops.
Performance can sometimes be significantly improved by implementing optional
cython code alongside the pure Python versions. While developing cython code,
make use of the official cython recommendations (http://docs.cython.org/). Add
your cython extensions to the setup.py, in the existing list of
raw_extensions.
Unlike the cython recommendation, the cythonized .c or .cpp files are not welcome in the git source repository (except original c or c++ files), since they are typically quite large. Cythonization will take place during Travis CI and Appveyor building. The cythonized code will be generated and included in source or binary distributions for end users. To help troubleshoot potential deprecation with future cython releases, add a comment with in the header of your .pyx files with the cython version. If cython is present in the build environment and any cythonized c/c++ file is missing, then setup .py tries to cythonize all extensions automatically.
To make the development easier the new command recythonize has been added
to setup.py. It can be used in conjunction with other default commands. For
example python setup.py recythonize build_ext --inplace will recythonize
all changed (and described in setup.py!) cython code and compile.
When developing on git branches, the first time you call setup.py in
conjunction with or without any other command - it will generate a
post-checkout hook, which will include a potential cythonization and
compilation product list (.c/.cpp/.so/.pyd). With your next git checkout
the hook will remove them and automatically run python setup.py build_ext
--inplace to cythonize and compile the code if available. If an older
version of HyperSpy (<= 0.8.4.x) is checked out this should have no side
effects.
If another custom post-checkout hook is detected on PR, then setup.py tries to
append or update the relevant part. To prevent unwanted hook generation or
update you can create the empty file .hook_ignore in source directory (same
level as setup.py).
7. Adding new methods
With the addition of the LazySignal class and its derivatives, adding
methods that operate on the data becomes slightly more complicated. However, we
have attempted to streamline it as much as possible. LazySignals use
dask.array.Array for the data field instead of the usual
numpy.ndarray. The full documentation is available
here. While interfaces of
the two arrays are indeed almost identical, the most important differences are
(da being dask.array.Array in the examples):
Dask arrays are immutable:
da[3] = 2does not work.da += 2does, but it’s actually a new object – might as well useda = da + 2for a better distinction.Unknown shapes are problematic:
res = da[da>0.3]works, but the shape of the result depends on the values and cannot be inferred without execution. Hence few operations can be run onreslazily, and it should be avoided if possible.
The easiest way to add new methods that work both with arbitrary navigation
dimensions and LazySignals is by using the map (or, for more control,
_map_all or _map_iterate) method to map your function func across
all “navigation pixels” (e.g. spectra in a spectrum-image). map methods
will run the function on all pixels efficiently and put the results back in the
correct order. func is not constrained by dask and can use whatever
code (assignment, etc.) you wish.
If the new method cannot be coerced into a shape suitable map, separate
cases for lazy signals will have to be written. If a function operates on
arbitrary-sized arrays and the shape of the output can be known before calling,
da.map_blocks and da.map_overlap are efficient and flexible.
Finally, in addition to _iterate_signal that is available to all HyperSpy
signals, lazy counterparts also have _block_iterator method that supports
signal and navigation masking and yields (returns on subsequent calls) the
underlying dask blocks as numpy arrays. It is important to note that stacking
all (flat) blocks and reshaping the result into the initial data shape will not
result in identical arrays. For illustration it is best to see the dask
documentation.