Using Git and GitHub#
For developing the code, the home of HyperSpy is on GitHub, and you’ll see that a lot of this guide boils down to properly using that platform. So, visit the following link and poke around the code, issues, and pull requests: HyperSpy on GitHub.
It is probably also worth to visit github.com and to go through the “boot camp” to get a feel for the terminology.
In brief, to give you a hint on the terminology to search for and get accustomed to, the contribution pattern is:
Setup git/github, if you don’t have it yet.
Fork HyperSpy on GitHub.
Checkout your fork on your local machine.
Create a new branch locally, where you will make your changes.
Push the local changes to your own HyperSpy fork on GitHub.
Create a pull request (PR) to the official HyperSpy repository.
Note
You cannot mess up the main HyperSpy project unless you have been promoted to write access and the dev-team. So when you’re starting out be confident to play, get it wrong, and if it all goes wrong, you can always get a fresh install of HyperSpy!!
PS: If you choose to develop in Windows/Mac you may find Github Desktop useful.
Use Git and work in manageable branches#
By now, you will have had a look around GitHub – but why is it so important?
Well, GitHub is the public forum in which we manage and discuss development of the code. More importantly, it enables every developer to use Git, which is an open source “version control” system. By version control, we mean that you can separate out your contribution to the code into many versions (called branches) and switch between them easily. Later, you can choose which version you want to have integrated into HyperSpy. You can learn all about Git at git-scm!
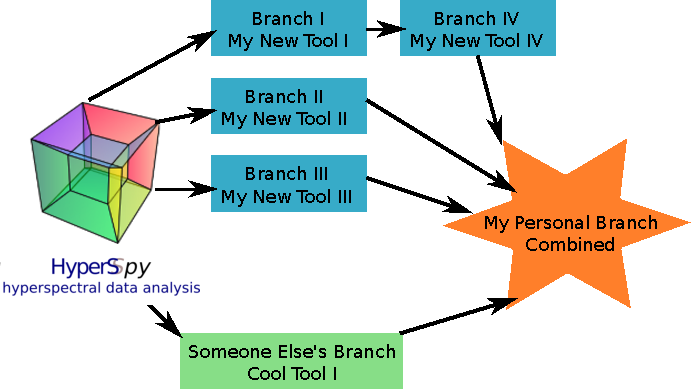
It is very important to separate your contributions, so that each branch is a small advancement on the “master” code or on another branch. In the end, each branch will have to be checked and reviewed by someone else before it can be included – so if it is too big, you will be asked to split it up!
For personal use, before integrating things into the main HyperSpy code, you can merge some branches for your personal use. However, make sure each new feature has its own branch that is contributed through a separate pull request!
Diagrammatically, you should be aiming for something like this:
Semantic versioning and HyperSpy main branches#
HyperSpy versioning follows semantic versioning and the version number is therefore a three-part number: MAJOR.MINOR.PATCH. Each number will change depending on the type of changes according to the following:
MAJOR increases when making incompatible API changes,
MINOR increases when adding functionality in a backwards compatible manner, and
PATCH increases when making backwards compatible bug fixes.
The git repository of HyperSpy has 3 main branches matching the above pattern and depending on the type of pull request, you will need to base your pull request on one of the following branch:
RELEASE_next_majorto change the API in a not backward-compatible fashion,RELEASE_next_minorto add new features and improvement,RELEASE_next_patchfor bug fixes.
The RELEASE_next_patch branch is merged daily into RELEASE_next_minor by the github action
Nightly Merge.
Changing base branch#
If you started your work in the wrong branch (typically on RELEASE_next_minor
instead of RELEASE_next_patch and you are doing a bug fix), you can change the
base branch using git rebase --onto, like this:
$ git rebase --onto <NEW-BASE-BRANCH> <OLD-BASE-BRANCH> <YOUR-BRANCH>
For example, to rebase the bug_fix_branch branch from RELEASE_next_minor onto RELEASE_next_patch:
$ git rebase --onto RELEASE_next_patch RELEASE_next_minor bug_fix_branch
Keeping the git history clean#
For review, and for revisiting changes at a later point, it is advisable to keep a “clean” git history, i.e. a meaningful succession of commits. In some cases, it is useful to rewrite the git history to keep it more readable:
it is not always possible to keep a clean history and quite often the code development follows an exploratory process with code changes going back and forth, etc.
Commits that only fix typographic mistakes, formatting or failing tests usually can be squashed (merged) into the previous commits.
When using a GUI for interaction with git, check out its features for joining and reordering commits.
When using git in the command line, use git rebase with the interactive option. For example, to rearrange the last five commits:
$ git rebase -i HEAD~5
In a text editor, you can then edit the commit history. If you have commits a...e and want to merge b and e into a and d, respectively, while moving c to the end of the hisotry, your file would look the following:
pick a ...
squash b ...
pick d ...
squash e ...
pick c ...
Afterwards, you get a chance to edit the commit messages.
Finally, to push the changes, use a + in front of the branch name, to override commits you have already pushed to github previously:
git push origin +lumberjack-branch
See, for example, How (and why!) to keep your Git commit history clean for a more detailed blog post on this subject.