Developer guide
This guide is intended for anyone that wants to write code that interacts with the UI. This can be relevant for tasks from gaining access to the loaded signals in the console, to writing plugins that extended the functionality of the UI.
One of the main components of the API is the
MainWindow class. This is the class of
the main UI window, and can be considered the hub to reach all the loaded
content, including signals and models, or Available actions,
Widgets and Tools.
Internal Console
The internal console is a qtconsole widget running IPython, and can
run any code that IPython can. To facilitate the typical use of the console,
numpy is pre-loaded as np, and hyperspy.api as hs. The current
MainWindow instance is also exported as
ui, and the list of currently loaded hyperspy
Signal instances is exported as siglist.
If we want to inspect the original metadata of the currently selected signal, we can then run:
In [1]: s = ui.get_selected_signal()

In [2]: s.original_metadata
Out[2]:
├── DATATYPE = Y
├── FORMAT = EMSA/MAS Spectral Data File
├── NCOLUMNS = 1.0
├── NPOINTS = 2048.0
├── OFFSET = 360.0
├── OWNER =
├── SIGNALTYPE = ELS
├── TITLE =
├── VERSION = 1.0
├── XPERCHAN = 0.2
├── XUNITS = eV
└── YUNITS = Counts
Code editor widget
Code editor widgets allow you to edit Python code directly within the application. This can be useful for Recording code, or for creating and modifying Plugins on the fly. An editor widget is opened by the New editor action, when a python script is opened, or when recording is started via the Recorder widget.
Recording code
Most if not all actions that the UI perform can be recorded. To start recording, press the ‘Start’ button in the Recorder widget. This will open up a new blank Code editor widget, that will be populated with code as actions are performed. The code can be edited while recording; the new code is simply appended at the end. Closing the widget will automatically stop the recording, but stopping the recording will leave the editor open.
One of the most useful ways to use the recorder, is to perform an action on one signal, and then select another signal and perform those same actions on it as well. This can be very useful if you e.g. need to crop both a core-loss and a low-loss spectrum, as they will be cropped to exactly the same region.
Note
While most of the code that is recorded tries to infer as much about its context as possible, it is not magical, so some manual adaptation of the recorded code might be needed. Typically, signal names need to be adjusted so that the right signals are used for different steps in a multi-step process.
Plugins
Once a sequence of steps have been recorded and adjusted, it can be saved as a python script which can then be loaded later for future use. However, if this is something that is used often, and does not change from session to session, this might become rather cumbersome. The easiest step then is to turn the code into a UI action, either as a menu item, or toolbar button. This is done by creating a new plugin. To ease the creation of a plugin, the Code editor widget has a button ‘Make Plugin’.
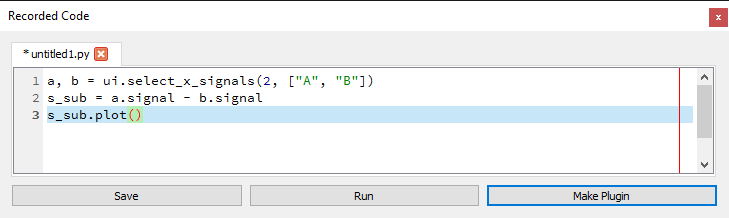
For example, here we’ve created a rather simple exmple for code to substract one signal from another (a little naive, as it doesn’t take data type into account):
Raw code:
a, b = ui.select_x_signals(2, ['A', 'B'])
s_sub = a.signal - b.signal
s_sub.plot()
In editor:
Clicking the ‘Make plugin’ button, we’re presented with a dialog, asking what the plugin should be called, whether we want to add it as a menu entry and/or toolbar button, which catgory it should go in (read: which menu and toolbar it goes into), and if it should have an icon (recommended for toolbar buttons):
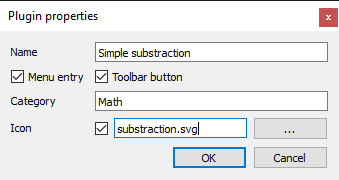
After deciding what we want, we click ‘OK’, and a new editor appears with the following code:
Raw code:
from hyperspyui.plugins.plugin import Plugin
import numpy as np
import hyperspy.api as hs


class SimpleSubstraction(Plugin):
    name = "Simple substraction"

    def create_actions(self):
        self.add_action(self.name + '.default', self.name, self.default,
                        icon="substraction.svg",
                        tip="")

    def create_menu(self):
        self.add_menuitem('Math', self.ui.actions[self.name + '.default'])

    def create_toolbars(self):
        self.add_toolbar_button(
            'Math', self.ui.actions[
                self.name + '.default'])

    def default(self):
        ui = self.ui
        siglist = ui.hspy_signals
        a, b = ui.select_x_signals(2, ['A', 'B'])
        s_sub = a.signal - b.signal
        s_sub.plot()
In editor:
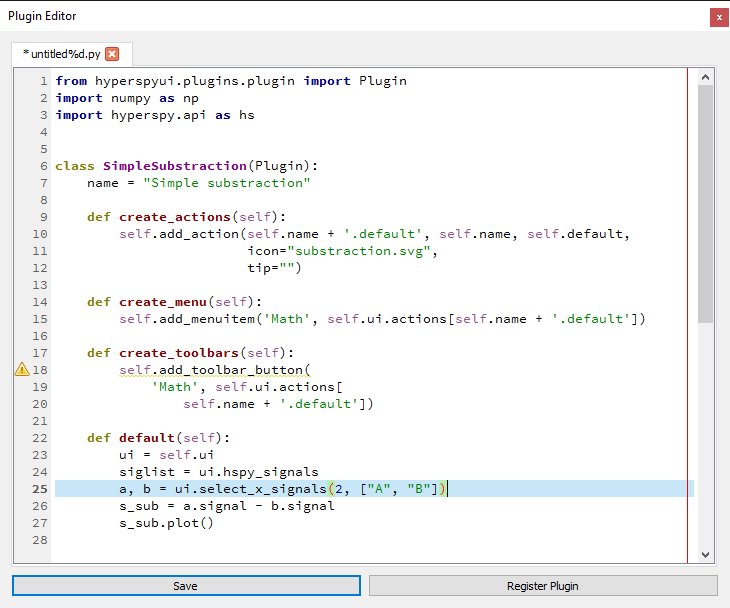
As can be seen, it has created a bare-bones plugin class, with a single action
called default. It also imports hyperspy and numpy, and sets the
variables ui and siglist such that the code works directly as in the
console. Our action is crated in
create_actions(),
added as a menu item in
create_menu(),
and as a toolbar button in
create_toolbars().
So now that we have the code for a plugin, all that remains is to register it. This we do by clicking the button ‘Register Plugin’ which has now replaced the buttons ‘Run’ and ‘Make Plugin’ (since they don’t make sense for a plugin). Now, as we have yet to save our code, we will at this point be asked to save the plugin script, as only saved files can be loaded as plugins. If we only want this plugin for the current session, we can save it anywhere. The next time we start the application, it will then not be loaded unless we manually register it again. However, if we want it to be loaded automatically every time we start the application, we need to save it in the ‘plugins’ directory (default location when the ‘Register Plugin’ button is pressed).
Note
If you are on the development version of HyperSpyUI, and don’t want to commit your plugin, you can also save it to the sub folder ‘user_plugins’, which is added to the .gitignore file.
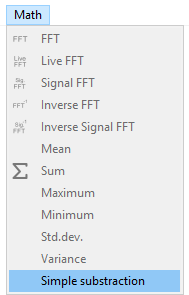
Once the plugin has been registered, it will automatically be loaded, and so we should directly be able to find our new menu entry like this:
Plugin manager widget
The plugin manager widget shows a list of all the discovered plugins (and any that have been added manually), their locations, and allows to set whether they should be loaded or not. There’s also an ‘Edit’ button which will open up the source code of the plugin in a new Code editor widget.
Unchecking a plugin will attempt to unload it, but the success of this
depends on the plugin correctly implementing its
unload() routine, which might not always
be the case.
Note
The unloading will only be partial if references to its content remain elsewhere in the program, so for this reason many core plugins will fail to unload fully.